
Как превратить AI в личного помощника
Полный русский перевод X Article о настройке AI personal assistant в Slack: каналы, approval line, интеграции, recurring tasks и подключение Claude Code через MCP.

Источник: https://x.com/undefinedKi/status/2100954972221317393
Автор: Yarchi
Звонки, которые нужно забронировать, счета, которые нужно проверить, продления, за которыми нужно проследить: AI personal assistant может снять эту рутину с вашей тарелки, чтобы часы уходили на работу, которую можете сделать только вы.
Это пошаговый guide по настройке AI personal assistant, который бронирует звонки, читает страховки, отслеживает subscriptions и каждую неделю готовит brief.
Что покрывает гайд:
- Записать всё, что висит над вами
- Провести approval line
- Настроить workspace
- Добавить AI personal assistant
- Подключить accounts
- Передать первые jobs
- Поставить неделю на schedule
- Подключить Claude Code через MCP
- Build sheet
Пять шагов. Первые три не используют AI и занимают около двадцати минут, но именно они делают всё последующее smooth и easy to use.
Нужный инструмент — Slack. Это chat app, где conversations organised into channels, one channel per topic, and apps can join as members of the team. Помощник из этого guide работает внутри него. Free plan достаточно.
Step 1. Запишите всё, что висит над вами
Составьте список всех tasks, которые сидят на заднем плане в голове: calls to book, emails to answer, insurance renewal, subscription, которую вы всё собираетесь проверить.
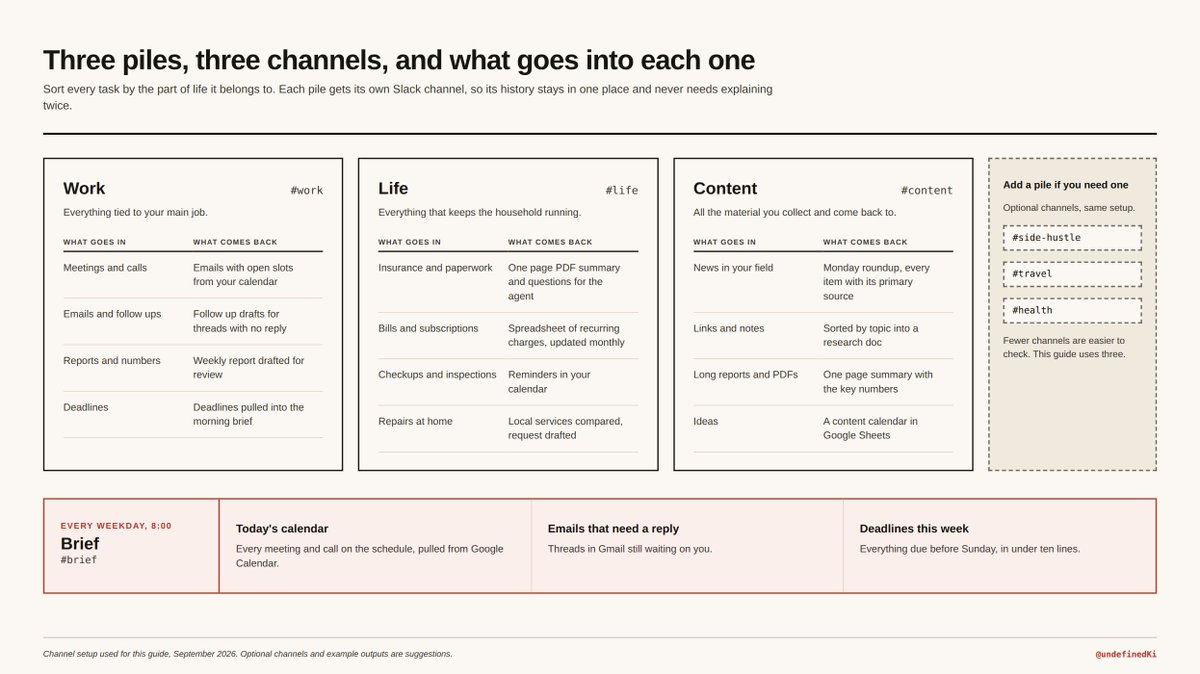
Затем рассортируйте list на три piles:
Work. Всё, что связано с основной работой: meetings, emails, reports, deadlines, follow ups, документы, которые вы готовите, и numbers, которые отслеживаете.
Life. Всё, что держит household running: insurance, bills, subscriptions, paperwork, appointments, scheduled checkups and inspections, и поиск человека, который починит сломанное.
Content. Весь material, который вы собираете: ideas, links, useful knowledge, notes и research, к которым хотите вернуться или позже превратить во что-то.
Добавьте ещё piles, если в вашей week они есть: side hustle со своими clients and invoices, travel plans, health and training, studying for a course, family logistics. Я держусь трёх, потому что fewer channels легче проверять.
Каждый pile становится channel. Sorting matters, потому что channel хранит history, а history — это context, который не нужно объяснять дважды.
Теперь настройте Slack:
- Перейдите на slack.com, войдите и выберите Create a new workspace.
- Дайте workspace имя. Пропустите шаг, где предлагают invite people.
- В sidebar выберите Add channels, затем Create a new channel. Создайте по одному channel на pile и один для summaries:
- #work для основной работы
- #life для household
- #content для ideas, links и research
- #brief для daily и weekly summaries
- Откройте каждый channel, выберите его name сверху и добавьте one line description через Edit description.

Step 2. Добавьте AI personal assistant
Я работаю с Viktor — AI employee, который присоединяется к Slack или Microsoft Teams как member of the workspace и работает с tools, которые вы ему подключаете.
- Перейдите на viktor.com и sign up with Slack.
- На Slack permission screen проверьте workspace name в правом верхнем углу. Если вы вошли в несколько workspaces, переключитесь на тот, что из step 1, до выбора Allow.
- Добавьте Viktor в каждый channel. Откройте channel, выберите name сверху, откройте Integrations tab, выберите Add an app и pick Viktor.
Перед тем как писать instructions, решите, что он может делать сам.
Каждое action попадает в одну из двух groups:
- Runs without asking: reading, searching, researching, summarising, drafting, preparing a document.
- Waits for your yes: sending, booking, paying, confirming, cancelling, deleting.
Тест — один question. Если это пойдёт не так, можете ли вы delete it before anyone notices? Если yes, it runs. Если другой человек это увидит или money moves, it waits.

- Откройте Viktor dashboard, перейдите в Settings, затем Behavior. В Personalization есть поле Workspace instructions.
- Вставьте это, заменив данные в brackets. Lines three and four — две группы выше:
I'm [name], based in [city] ([time zone]). You're my personal assistant. You can read, search, research, draft and prepare anything without asking. Always ask me before you send, book, pay, confirm or delete anything. If you don't have the data, say so. Don't guess. Keep updates short.
- Выберите Save changes.
Instructions применяются к каждому conversation in the workspace, так что вы пишете их один раз. Строка about missing data выглядит minor. Она проявляется в каждом result ниже.
Step 3. Подключите accounts
В Viktor dashboard откройте Integrations в left menu и подключите три:
- Gmail
- Google Calendar
- Google Drive
Каждый откроет Google sign in. Выберите account, куда приходят bills and meeting invites.
Google Calendar или Google Drive apps, установленные внутри Slack, отдельные и не дают Viktor access. Подключайте их через dashboard.
Эти три cover everything in this guide, но Integrations page содержит 3,000+ tools. Тот же assistant может reach the rest of your week: GitHub и Linear для work projects, Granola и Otter для meeting notes, Stripe для payments, Meta Ads и Google Ads, если вы ведёте campaigns.
Step 4. Передайте первые jobs
Каждый job ниже включает prompt to copy и result, который он produced.
Book a call
В #work:
@Viktor Find 30 minutes next week for a call with [name, email]. Check my calendar, draft an email with three open slots, and show it to me before sending.
Он проверяет calendar, выбирает три slots in business hours, пишет email и останавливается. Под draft лежат три buttons: Approve, Always approve this tool и Reject. Строка над ними называет exact action waiting — в этом случае sending a Gmail message.
После отправки email он задаёт ещё один question: hold all three slots as tentative in the calendar или wait for the reply and book the slot that gets picked.

Ничего не уходит без click on Approve. Если вы отправляете same email on a schedule, например weekly update, Always approve this tool позволит им уходить самостоятельно. Setting covers the whole tool, поэтому каждый email, который он отправит после этого, тоже skip approval step.
Разобрать страховку
В #life:
@Viktor Find my auto insurance documents in Gmail and Drive. Make a one page PDF summary: coverage, renewal date, what I pay. Then list the questions I should ask before renewal.
В thread появляется PDF: policy details, contact agent, twelve months of payments и renewal timing. Он также traced jump in monthly price to two policy changes by their reference numbers.
Coverage limits и deductibles отсутствовали в inbox, потому что insurer emails only link to online portal. Он сказал это сверху reply, отметил gap в отдельной section PDF и назвал document to request. Renewal date carries a note: inferred from past notices and still unconfirmed.
Потом он предложил написать agent. One reply later появляется draft с восемью specific questions, waiting for approval, и reminder на mid November, когда должен прийти next renewal notice.

Найти каждую subscription
В #life:
@Viktor Go through my receipts in Gmail from the last 90 days and build a spreadsheet of recurring charges: service, amount, billing date, next renewal. Flag anything I might have forgotten about.
Возвращается Excel file с 19 recurring charges. Flags наверху: same subscription paid twice from two different cards, two trials about to convert to paid within weeks, membership where autopay had failed twice while membership stayed active, and a domain with auto renew switched off.
Где receipt had no amount, cell stayed empty. Sourcing note говорит, что он оставил blank rather than guessing, following the instruction from step 2.
Он предложил повторять sweep every month. Confirmation spells out the limit: read only, he never cancels or pays anything.

Ещё jobs, которые можно передать
Три jobs выше — starting point. Всё, что lives in your inbox, calendar or files, can go to the same channels.
Work
- Перед call собрать every past email with that person в one page brief
- Найти threads, где вы всё ещё waiting on a reply after five days, и draft follow ups
- Собрать weekly report from a Google Sheet и post it for review
- Превратить meeting transcript в follow up emails и task list
Life
- Собрать quotes from contractors из inbox и compare them in a table
- Вытащить warranty end dates и inspection deadlines из receipts и put reminders in the calendar
- Найти local repair services with good reviews и draft request for a visit
- Превратить booking confirmations в one trip plan с times, addresses и reference numbers
Content
- Summarise long report или PDF в one page with key numbers
- Разобрать month of saved links by topic into research doc in Drive
- Превратить list of ideas into content calendar in Google Sheets
Step 5. Поставьте week on a schedule
Schedule — это one sentence, posted in the channel where results should land. Viktor превращает его в recurring task, listed under Tasks in the dashboard.
Every weekday, in #brief:
@Viktor Every weekday at 8:00 AM ET, post a brief here: today's calendar, emails that need a reply from me, and anything with a deadline this week. Under 10 lines.
Every month, in #life: subscription sweep from step 4, on the 1st. Each run reads the last 35 days, updates the spreadsheet and opens with what changed.
Every Monday, in #content:
@Viktor Every Monday at 9:00 AM ET, post a roundup of what's new in [your field] from the past week. For each item: one line on what happened, why it matters, and a link to the primary source. Skip anything you can only find in secondary coverage. Top 10 max. Don't write the posts.
В понедельник приходит grouped by topic список, и у каждого item есть date и link to original source. Последняя строка lists what got cut for lacking one. Он также keeps a log, так что story from last week не попадает в this week's list.

Подключить Claude Code через MCP (для advanced users)
Viktor также работает как MCP server, поэтому coding agent на вашем computer может передавать ему работу. Claude Code может run project on your machine. Viktor имеет Slack, Gmail, Calendar и Drive. В связке один finishes what the other starts.
- В Viktor dashboard перейдите в Settings, затем API Keys, и выберите Generate Key.
- Выберите personal key и grant three scopes: threads:create, runs:create and runs:read. Server offers only tools allowed by key scopes, so start small.
- Скопируйте key. Он показывается один раз.
- Откройте terminal и сохраните key.
On macOS or Linux:
export VIKTOR_API_KEY="your_key"
On Windows PowerShell:
$env:VIKTOR_API_KEY = "your_key"
- Добавьте Viktor в Claude Code.
On macOS or Linux:
claude mcp add --transport http viktor https://api.viktor.com/mcp --header "Authorization: Bearer $VIKTOR_API_KEY"
On Windows PowerShell:
claude mcp add --transport http viktor https://api.viktor.com/mcp --header "Authorization: Bearer $env:VIKTOR_API_KEY"
- Запустите
claude mcp list. Viktor должен отображаться как Connected.
Runs, started this way, use workspace credits like any other task.

Что делать с парой
Claude Code работает с тем, что лежит на вашем computer: code, local files, terminal. Viktor работает с тем, что lives in your accounts: Slack, email, calendar, documents. Through MCP, Claude Code finishes its part and hands the rest to Viktor in the same prompt.
- Claude Code читает commits за week и пишет progress report, Viktor saves it to Drive и drafts email to client for approval
- Claude Code runs test suite, Viktor posts what failed to #work, so it reaches you on your phone
- Claude Code analyzes data export on your machine, Viktor turns result into Google Sheet и shares link in Slack
- Before a client call, Viktor pulls email thread into brief, Claude Code checks project against what was promised
- Long task runs in terminal while you are away, Viktor posts summary the moment it finishes
Один пример из guide. Я попросил Claude Code установить мой own open source repo from its README the way a new user would, fix whatever broke and send the report through Viktor. Он прошёл setup on Windows, нашёл eight problems, fixed seven without pushing anything, и через минуту Viktor posted report in #work: what broke, what got fixed, and five questions waiting for my decision.
The build sheet
Сохраните это.
- One workspace, four channels: brief, work, life, content
- One set of workspace instructions with the approval line inside
- Reading and drafting run on their own, sending, booking and paying wait for you
- Approve each action and keep Always approve for tools that change nothing outside
- Gmail, Calendar and Drive connected through the Viktor dashboard
- Every recurring job is one sentence with a time in it
- A new job only after the last one arrives without you starting it
Когда это работает, week начинается с answers. Brief ждёт утром, subscriptions проверяются 1-го числа, insurance questions drafted before renewal, а news in your field отсортированы к понедельнику. Routine уходит в channels, а attention — в work only you can do.
Setup занимает afternoon. После этого каждый new job — one message.
Начните с task, которую избегали дольше всего, и дайте assistant earn the second one.
Thanks @viktor_com for sponsoring this article!
Try free at @viktor_com. $100 in credits, no card. Link: viktor.com
Paid Partnership